7 Simple Solutions to Speed up SSD in Windows 10

SSD, short for solid-state drive, is actually a storage device that is simply faster than HDDs when it comes to storing and accessing data. SSD can increase the boot and running speed of the computer, which can bring a better using experience to the individual users. Nevertheless, can SSD run faster? The answer is yes. This post will walk you through 7 ways to speed up solid-state drive in Windows 10.
- Solution 1: Defragment the disk
- Solution 2: Use Storage Sense to delete temporary files
- Solution 3: Don't store large files on the hard drive
- Solution 4: Create a separate partition for the operating system
- Solution 5: Use the software provided by the manufacturer
- Solution 6: Configure boot sequence
- Solution 7: Update your firmware
Solution 1: Defragment the disk
This is a common way to speed up SSDs, but there are some things you need to know: Windows 10 is automatically clean up the disk once a month when appropriate. Therefore, it's no need to clean the disk frequently except for your computer constantly handles large range of tasks which needs defragmenting at least once a week. In this case, you can schedule disk cleanup in Windows 10 through "Task Scheduler" or Command Prompt. Find the steps in this article: How to Schedule Disk Cleanup in Windows 10.
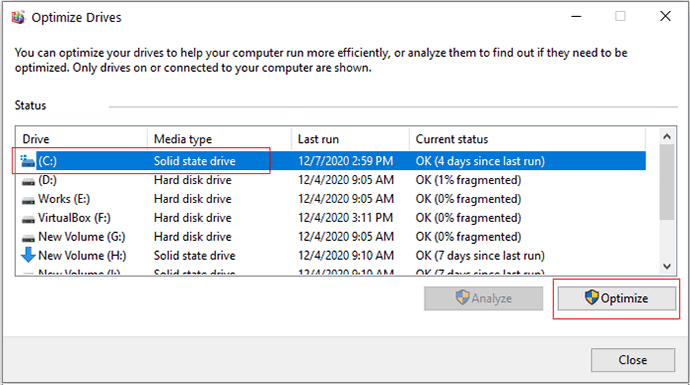
If you want to defragment by yourself, here are specific steps for you to follow:
1. In the search box on the taskbar, type “defrag”.
2. Click “Defragment and Optimize Drives”.
3. Select the disk drive you want to optimize.
4. Choose the “Optimize” button.
In order to speed up SSD, it's necessary to leave enough space in each partition to avoid insufficient space. There are 3 solutions below help you achieve that goal.
Solution 2: Use Storage Sense to delete temporary files
Don't fill to full capacity. It is best to leave 10-15% of free space for drives to maintain a good balance between performance and space utilization. If you find that the remaining space of a partition is close to or less than 10%, you need to clean up unnecessary files and folders from SSD.
Steps:
1. Click the Start button to open "Settings".
2. After then click “System” and ”Storage”.
3. Under the "Local Disk (C:)" section, choose the “Temporary files”.
4. Tick all the items you want to clear to free up space. Like, Downloads, Delivery Optimization Files, Temporary files, Thumbnails.,etc.
5. Click the "Remove files" button.
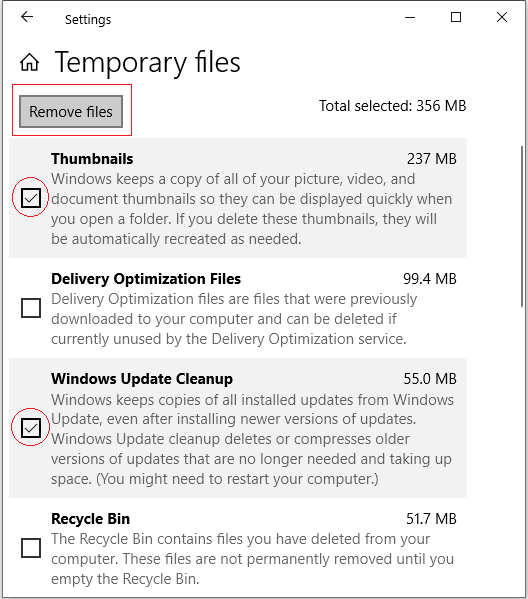
If you want to free up disk space better, there is an article for your reference: How to Clear Up SSD Space in Windows 10, which provide you with 6 ways to clean disk space.
Cleaning up temporary files is a effective but short-term method. To avoid disk stuck better, you need to understand the following solutions.
Solution 3: Don't store large files on the hard drive
Do not store large files (such as movies or music collections) on the hard drive, as this will take up a certain range of space and will hurt the performance of computer. If you don't want to modify the download path every time you download a large file (usually the default path is C drive), you can use System Genius to change the default download path of the file.
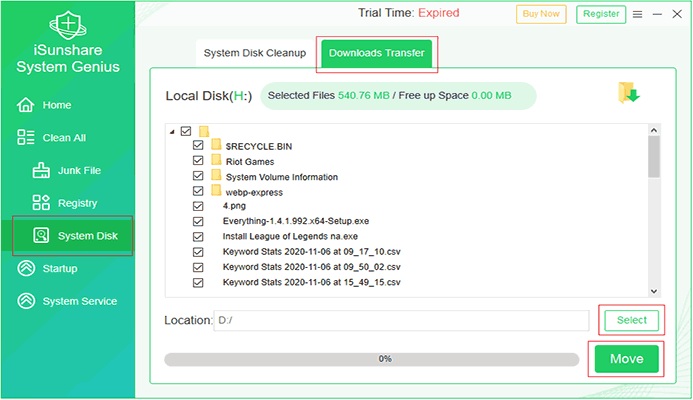 Download: System Genius
Solution 4: Create a separate partition for the operating system
Make sure to always create a separate partition for the operating system and do not save anything else on it. The files stored in the SSD should preferably be accessed quickly and frequently, and the size and frequency of the operating system files and program files are suitable for running on the SSD. Remember to back up useful data before partitioning SSD.
Here are the steps to partition SSD with disk management:
1. In the search box on the taskbar, type "Computer Management" and open it.
2. In the left pane, under "Storage", select "Disk Management".
3. Right-click one SSD partition and select "Shrink Volume". Enter the amount of space you want to shrink then click on the "Shrink" button. (This would create unallocated space.)
4. Right-click on the unallocated space and select "New Simple Volume".
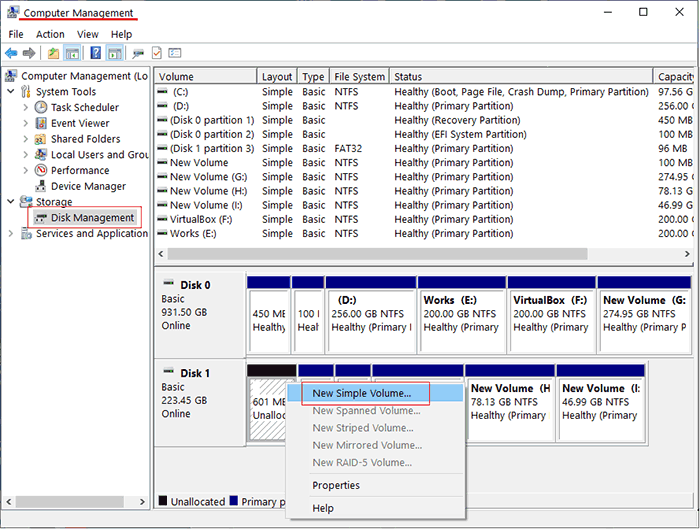
5. Click "Next" and enter a volume size. This is the size of your new SSD partition. Then choose a letter to name this drive.
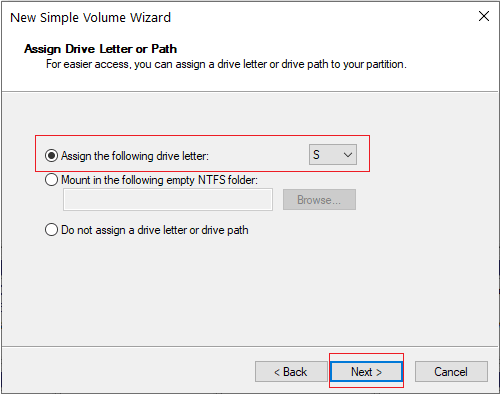
6. "Format this volume with the following settings". To select the "File system" as "NTFS" and choose "Allocation unit size" to the "Default".
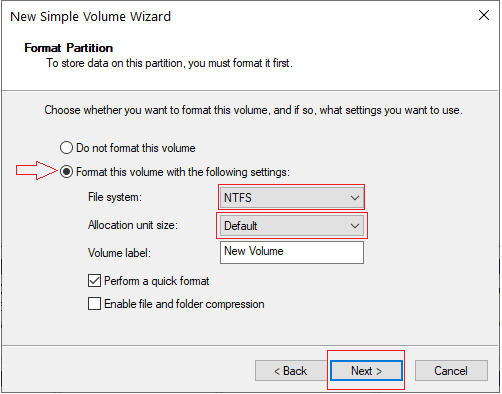
7. Click "Next" and "Finish" to complete creating a new partition in Windows 10.
When it comes to organizing partitions, you are likely to wonder what should be stored in each partition and how much space should be allocated. Read our in-depth analysis of Best Partition Size of 500GB Hard Disk for Windows 7, 8 and 10, and you will know the answer. For 1TB hard drive, see the Best Partition Size for 1TB Hard Drive in Windows.
Solution 5: Use the software provided by the manufacturer
You can optimize SSD by using the software provided by the computer manufacturers for it will be safer and more suitable for your computer. If your SSD is made by Intel, you can download Intel SSD Toolbox. to optimize your SSD. If it's made by Samsung, you can optimize SSD via Samsung SSD Magician.
Solution 6: Configure boot sequence
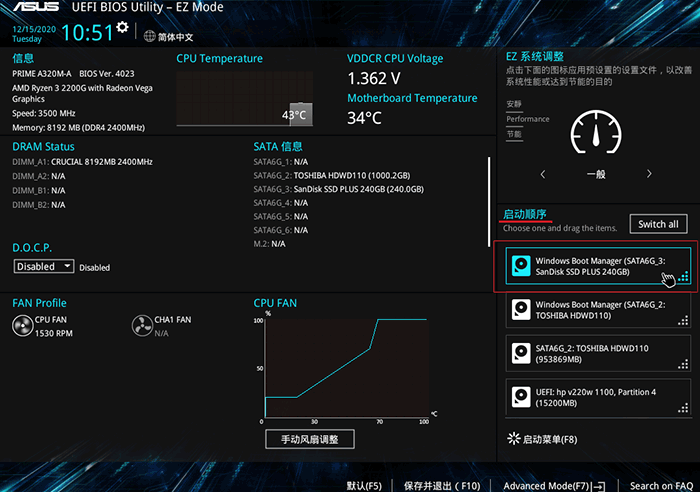
When the hard drive has the highest priority at the startup, the SSD drive has to take longer time to acquire the operating system. To solve this problem, you need to enter the BIOS to give SSD the highest priority at boot time.
Steps:
1. Reboot your PC and enter BIOS by pressing the corresponding button.
2. Find the startup section on the right side.
3. Change the boot sequence of HDD and SSD by giving first priority to SSD.
Solution 7: Update your firmware
In order to ensure that your SSD can operate normally, it is worthwhile to update the firmware on the SSD. Updating the firmware can not only identify and solve new errors and problems but improve SSD performance and drive stability.
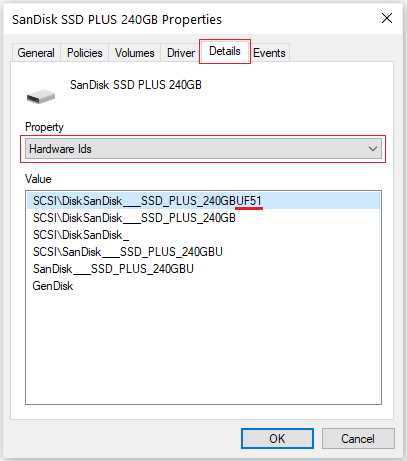
Before updating, you should find out your firmware revision, and then check the manufacturer's official website to see if there is any firmware that needs to be updated. If so, you just need to update it according to the instructions. It is strongly recommended backing up all data before upgrading the firmware.
Here are steps to find your firmware revision:
1. Right-click your Start button, and choose the "Device Manager" to open it.
2. Expand "Disk drives"
3. Right-click the SSD and select "Properties"
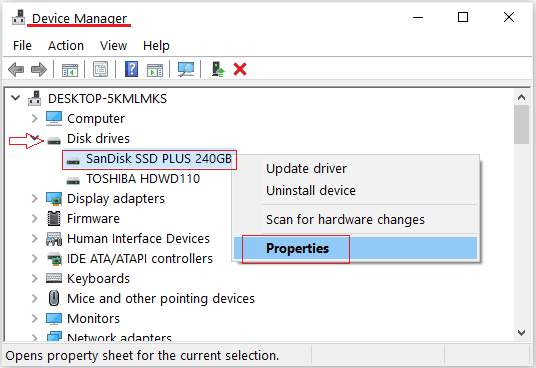
4. On the "Details" tab, select "Hardware Ids" from the drop-down menu
