Creating a Chrome OS Flex Bootable USB: Full Tutorial
Creating a bootable USB for Chrome OS Flex allows you to install or try out the operating system on your device. This tutorial will guide you through two methods: using the Chromebook Recovery Utility and a third-party utility like Rufus. Both methods are straightforward, but each offers different levels of customization. Whether you want a one-stop solution or greater flexibility, we’ve got you covered.
1. What is Chrome OS Flex?
Chrome OS Flex is a lightweight, fast, and secure operating system designed by Google. It is built on the same foundation as Chrome OS but is optimized for non-Chromebook devices. Chrome OS Flex offers a modern computing experience with access to web apps, seamless updates, and robust security features. It's an excellent option for reviving older hardware or simply experiencing Google's ecosystem on a different platform.
2. Methods to Create ChromeOS Flex bootable USB
2.1 Use Chromebook Recovery Utility
The Chromebook Recovery Utility is an official Google tool, making it a convenient one-stop solution for creating a bootable USB for Chrome OS Flex.
Step 1: Open the Google Chrome browser and search for the "Chromebook Recovery Utility" in the Chrome Web Store. Add the extension to your browser.
Step 2: Click on the plugin icon to open the Chromebook Recovery Utility interface.
Step 3: Click on the "Get Started" button, then click on "Select a model from a list".
Step 4: From the "Select a manufacturer" dropdown, choose "Google ChromeOS Flex". Then, from the "Select a product" dropdown, choose "ChromeOS Flex". Next, click the "Continue" button to proceed.
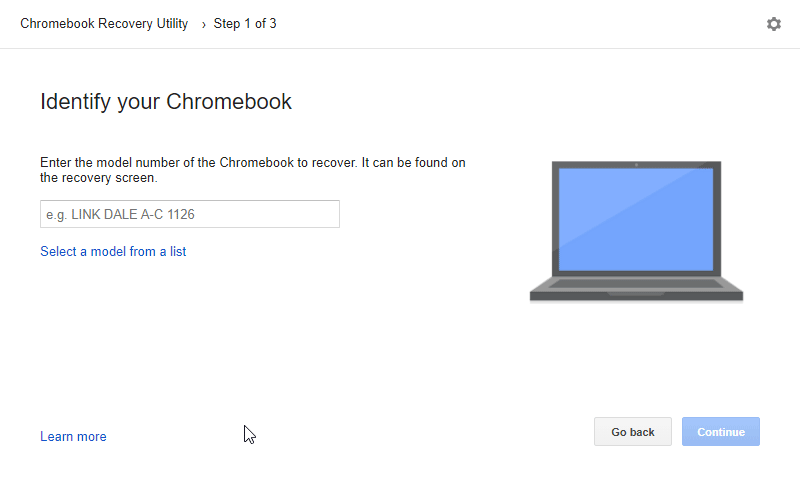
Step 5: Insert your USB drive into the computer. Select your USB drive from the list and click "Continue".
Step 6: Click "Show Advanced Settings" and select "Stable" from the dropdown box.
Step 7: Click the "Create now" button and wait for the process to complete.
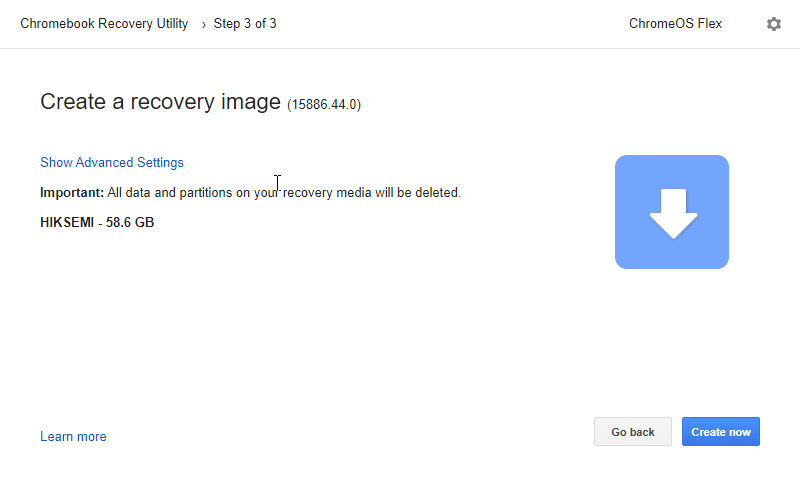
Note: Before writing data to the USB, a popup will ask if you allow Chrome to make changes to your device. Click "Yes".
Tip: You can also use a local image to create the bootable USB. Click on the settings icon in the top right corner, then select "Use local image".
2.2 Use a Third-Party Utility
Using a third-party utility like Rufus provides greater flexibility, allowing you to choose specific versions of Chrome OS Flex.
Step 1: Download your desired version of Chrome OS Flex from this "Chromium Dash Builds" link.
Step 2: Download and install Rufus or any other bootable USB creation tool.
Step 3: Insert your USB drive into the computer.
Step 4: Open Rufus and select your USB drive from the "Device" dropdown. Click "Select" and choose the downloaded Chrome OS Flex zip file.
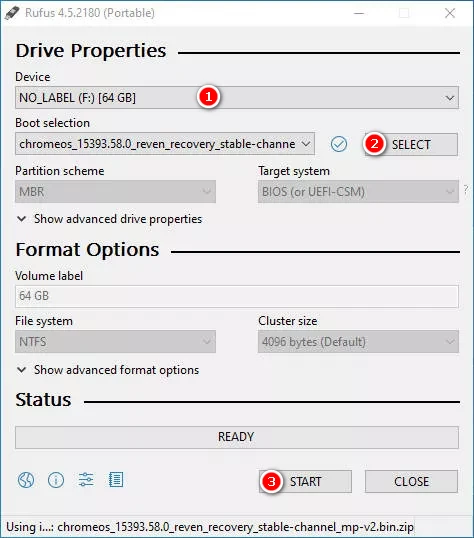
Step 5: Click the "Start" button and wait for the process to complete.
Caution: All data on the USB drive will be erased, so make sure to back up any important data beforehand.
4. Conclusion
This tutorial provided two methods for creating a Chrome OS Flex bootable USB. Choose the method that best fits your needs. Once the bootable USB is ready, you can install or try Chrome OS Flex on your device by booting from the USB drive. Good luck!


