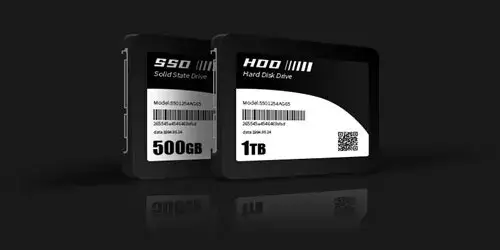
8 Ways to Optimize Drives in Windows 10 for SSD & HDD

With its features of high performance, low power consumption and zero noise, SSD (solid state drive) has always been the first choice for most people to upgrade or newly purchase a machine. However, sometimes you may find that even if equipped with SSD, the PC's performance is not a patch on others. How is that? Here are 8 ways to optimize drives in Windows 10 for SSD & HDD, you can follow this guide to do drive optimization, realizing a faster operating speed.
- Way 1: Confirm SATA Controller Runs in AHCI Mode for SSD
- Way 2: Confirm TRIM is Open for SSD
- Way 3: Disable Disk Indexing Service for SSD
- Way 4: Enable Write Caching
- Way 5: Turn off System Restore for SSD
- Way 6: Move Pagefile.sys to Another Partition
- Way 7: Change Temp File Location
- Way 8: Optimize Disk via Third-party Tool
Part 1: Increase Disk Read-write Speed
Way 1: Confirm SATA Controller Runs in AHCI Mode for SSD
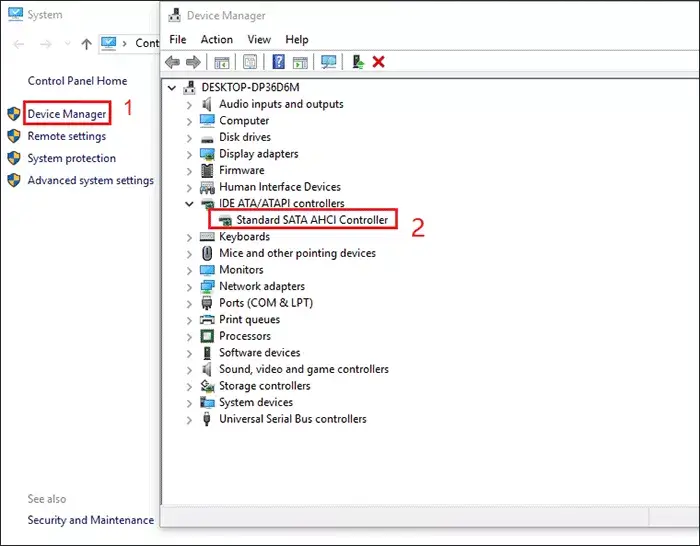
The first step in SSD optimization is to make sure disk read-write mode is AHCI. But for Windows 10, as long as it is installed normally, disk mode is automatically set as AHCI. Open the device manager to check it.
Right-click This PC->Properties->Device Manager, double click the IDE ATA/ATAPI controllers, and check its mode. The SATA of solid state drive is shown below.
Way 2: Confirm TRIM is Open for SSD
TRIM is important for enhancing the read-write capability of SSD and reducing latency. So it is necessary to open it to optimize your solid state drive. Confirm whether TRIM is open or not as follows:
Open the start menu, enter cmd on the search windows box, right-click to run the command prompt as administrator, and then input the command:
fsutil behavior query DisableDeleteNotify.

You will get a return value. If the value is 0, it means TRIM is on; otherwise, if the return value is 1, it means TRIM is off.
Way 3: Disable Disk Indexing Service for SSD
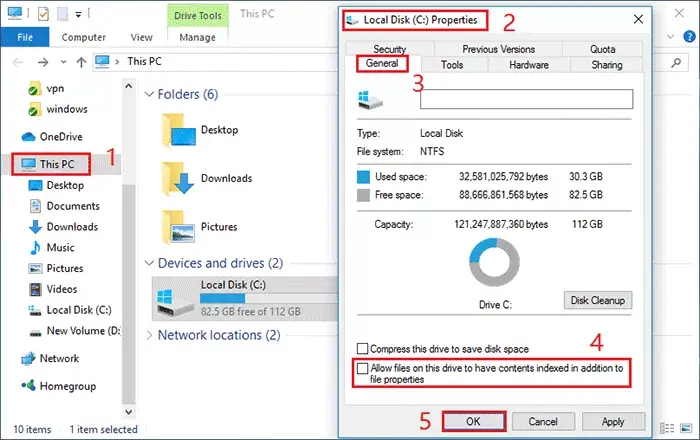
Disk indexing service aims to fast the search function by storing an index of file location. While with a high random read performance of solid state drive, it is so quick to get searching results by applying the search function without indexing. What's more, to close the disk indexing can greatly expand the life of SSD. You can follow the steps below to disable it:
Double-click This PC, right-click the drive-> Properties->General, uncheck "Allow files on this drive to have contents indexed in addition to file properties" below, and tap on OK.
Way 4: Enable Write Caching
Write caching does extremely improve the system performance by a quick data read-writing. But you must pay more attention to power interruption, which may result in data loss on the disk.
Right click This PC -> Properties -> Device Manager, select the drive and right-click on it -> Properties -> Policies tab, then check "Enable write caching on the device" and tap on OK.
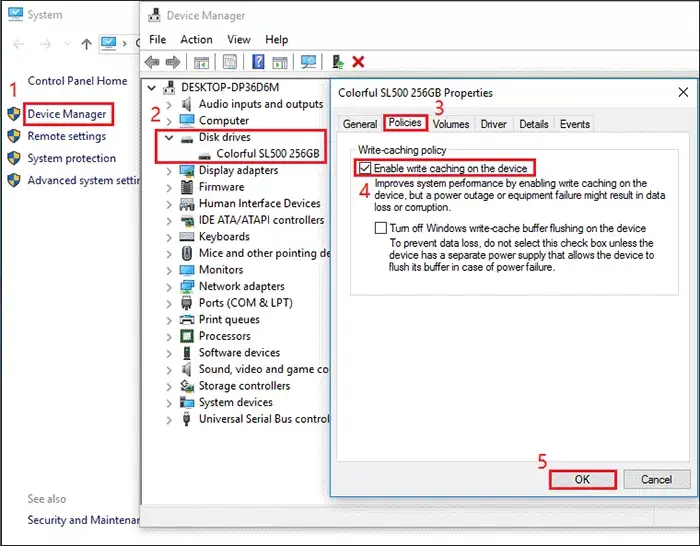
Attention: Please do not check "Turn off Windows write-cache buffer flushing on the device" in the above picture to avoid losing data that has not been written to the disk when the power is suddenly turned off or the computer crashes.
Way 5: Turn off System Restore for SSD
System Restore will affect the normal operation of the SSD or TRIM, lowering the SSD's read and write capabilities. How to close it?
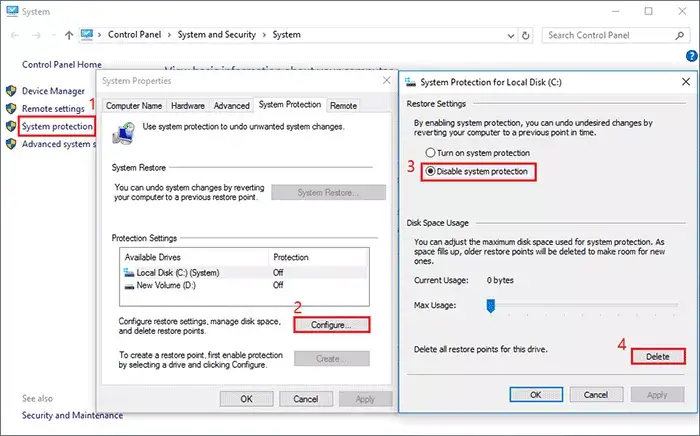
Right-click This PC -> Properties -> System Protection -> Configure button below, select "Disable System Protection" in the popup window, and click "Delete" to remove all system restore points.
Part 2: Free up More Space for C Drive
Way 6: Move Pagefile.sys to Another Partition
Page file, a component of virtual memory, is subject to intensive reads and writes. You can move paging file to another disk to upgrade operating speed. The steps are as following:
-
Step 1: Right-click This PC on the desktop, select Properties-> Advanced system setting, and click "settings" button in "Performance" column.

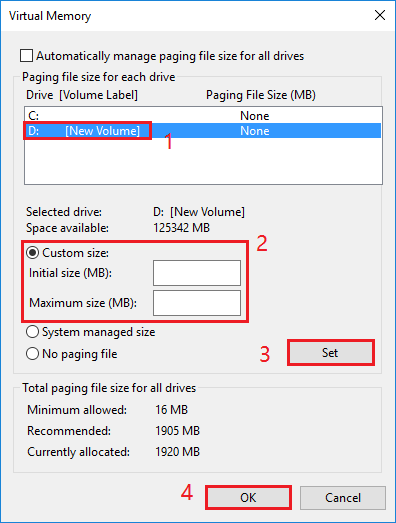
- Step 2: Select "Advanced" tab in the popup window, and click "Change" button in "Virtual Memory" column to pop up the "Virtual Memory" window. If the option of "Automatically manage paging file size for all drives" is checked, please uncheck it firstly. Select the system drive(C drive) in Drive list box, check "No paging file" option and click on "Set" button and Then "OK".

-
Step 3: Select another drive, for example D drive -> select "Custom size" option -> enter the value of "Initial size" and "Maximum size" -> Set -> OK.
Finally, restart the computer for the settings to take effect!
Way 7: Change Temp File Location
In the same way, you can also change the location of temp files to optimize disk performance.
-
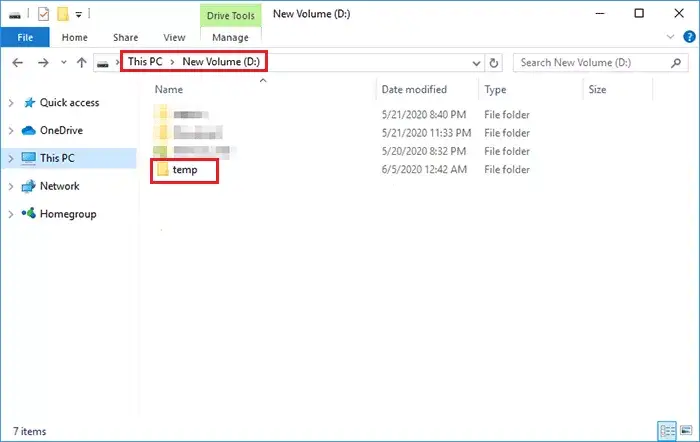
Step 1: Create a new directory named temp on D drive.
-
Step 2: Right-click on This PC, select Properties -> Advanced system setting -> Environment Variables.

-
Step 3: In System Variables drop-down list box, drag vertical scroll bar to the end, the variables TEMP and TMP can be seen. Double-click on TEMP or TMP, and change the value of temp or tmp to D:\temp in the popup box. Or you can choose Browse Directory to find the folder named temp newly created on the D drive. This change will take effect after restarting the computer.

Way 8: Optimize Disk via Third-party Tool
Through the above simple optimization methods, we can maximize the performance of SSD & HDD by system setting in Windows 10. In addition, we can also utilize some software for SSD optimization to make the SSD run more smoothly. Here are 4 optimization tools recommended to you: Samsung SSD Magician, Intel SSD Toolbox, SSD Tweaker.
Watch the Video Tutorial
Learn 8 ways to optimize drives in Windows - Watch the video now!


