Troubleshoot Remote Desktop Cannot Connect to Remote Computer Issue in Windows 10

I tried to connect the remote computer with Remote Desktop feature in Windows 10, and then I received an error message which indicates that it failed to connect the remote computer from one of the three reasons: (1) Remote access to the server is not enabled; (2)The remote computer is turned off; (3)The remote computer is not available on the network. What shall I do to solve this issue?
Remote Desktop, also called RDP or Remote Desktop Protocol, is a handy feature provided by Microsoft in Windows 10 and almost all earlier versions of Windows. Remote Desktop allows the users to access the computer over the network. But, sometimes the users may encounter with the disconnected error as the above case. The article Troubleshoot Remote Desktop Cannot Connect to Remote Computer Issue in Window 10 aims to provide some methods which may help you solve the remote desktop connection error and access the remote computer successfully.
Method 1: Allow RDP in Windows Firewall
In most cases, the disconnected issue of Remote Desktop can be put down to Windows Firewall, which blocks some incoming and outgoing connections by default. Therefore, let's check if the firewall enables remote connection first:
-
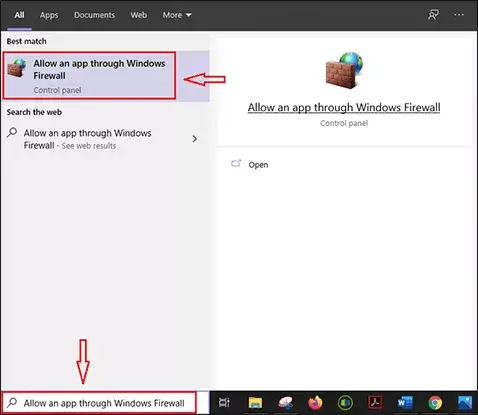
Step 1: Type Allow an app through Windows Firewall in Start Search bar, and double-click the first matching result of control panel to open it.
-
Step 2: Click on Change settings button ->Navigate to Remote Desktop feature by scrolling down ->Tick the checkbox in front of it (Private and Public) ->Click on OK. Then check if the issue remote desktop unable to connect is solved or not.

Method 2: Verify RDP is Enabled
Enabling Remote Desktop on the computer is another must to do for remote connections. Confirm whether RDP is allowed or not as follows:
-
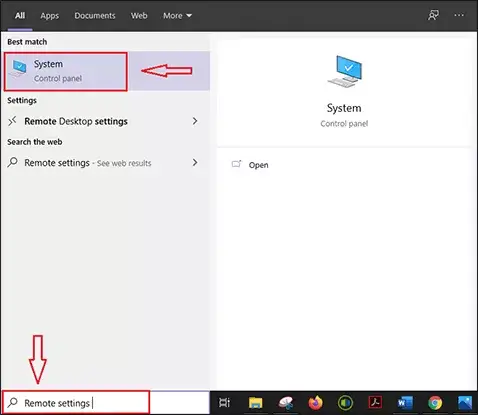
Step 1: Type remote settings in Start Search bar, tap on Enter, and select the matching result System.
-
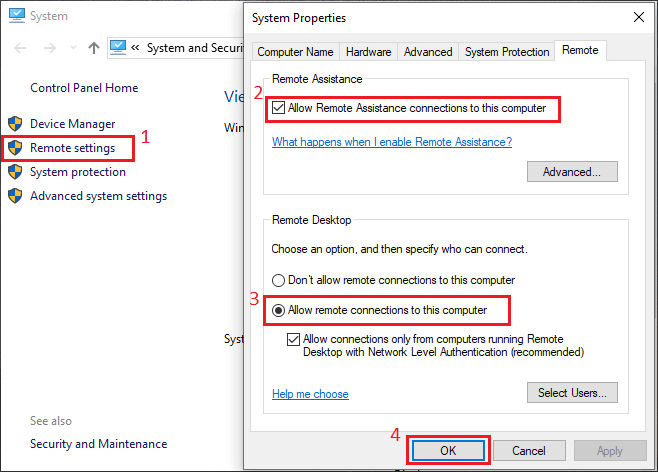
Step 2: Click on Remote settings in the left panel of System window, and a dialog box named System Properties pops up. Check Allow Remote Assistance connections to this computer and Allow remote connections to this computer and then click on OK.
Method 3: Reset Credentials of RDP
When you connect to a remote computer with Remote Desktop Connection client, the credentials for that computer will be stored by Windows if you checked Remember me box. And next time you apply the saved credentials to log on the remote computer, which may cause an error for the two computers have different credentials. For this case, you need to reset credentials of RDP.
-
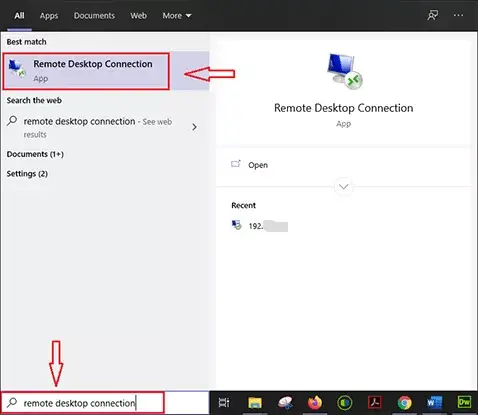
Step 1: Type Remote Desktop Connection in Start Search bar, and pick the best match result as the screenshot below shown.
-
Step 2: The Remote Desktop Connection client dialog box is open, and the credentials saved before is shown. Click edit or delete below the drop-down list to reset the credentials. Then retry the remote connection to see if the error is fixed or not.

Method 4: Make Changes to Registry
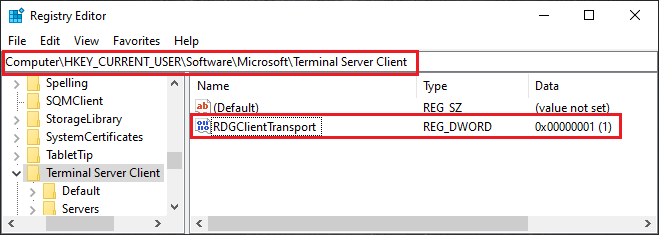
For the issue of remote computer connection failure, some users figured it out through making small changes to registry. And a new DWORD key will be created in the Windows Registry to force the RDP to use RPC/HTTP connections. Follow the guide below to add the key:
Steps: Press Windows key + R to open Run app -> Type regedit in the Run app and tap Enter -> Navigate to the following path in registry editor: HKEY_CURRENT_USER/SoftwareMicrosoft/Terminal Server Client -> Right click on the right side of the pane and click on New -> select DWORD(32-bit Value) -> Name it RDGClientTransport -> Double-click the new key and set its value data as 1 -> Click OK.
Method 5: Add the Remote Computer's IP Address to Hosts File
One more workaround for resolving the error is to add the IP address of the remote computer to your hosts file. Try it out!
-
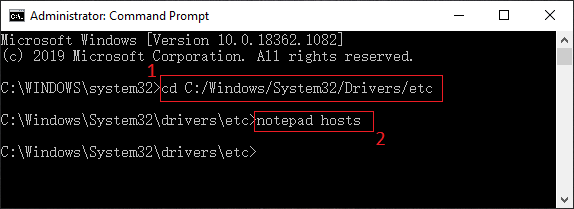
Step 1: Input cmd in Start Search bar -> Right-click the best match result Command Prompt app and choose Run as administrator to open it -> Copy and Paste the command cd C:/Windows/System32/Drivers/etc and tap on Enter -> type the command notepad hosts to open the hosts file in Notepad.
-
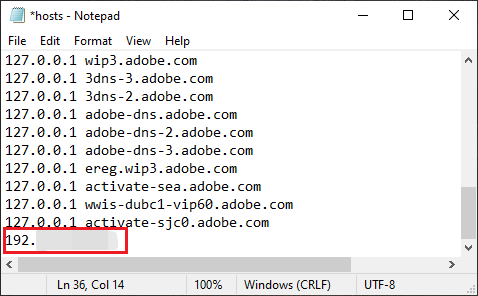
Step 2: The hosts file is open in Notepad, and add the IP address of the Remote computer to the end of the file, then click on the close button and choose to save changes.
Method 6: Change the Default Port of RDP
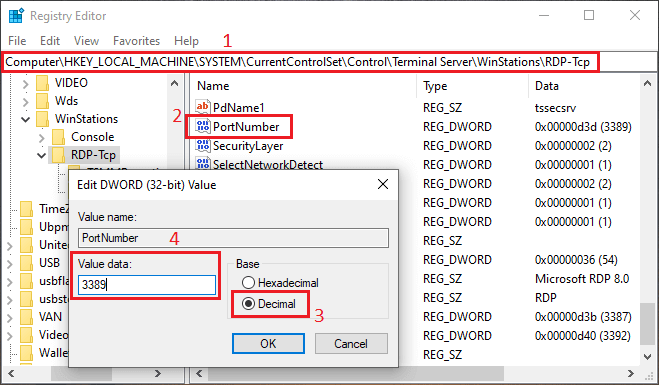
Port 3389 is set as a default port for Windows Remote Desktop. Sometimes it is occupied by other application, causing the problem remote desktop cannot connect to the remote computer. Thus, we can change the default port of Remote Desktop to fix the problem, which also can improve server security.
Steps: Input Run in Start Search bar -> Type regedit in Run app to open the Registry Editor -> Locate the following path: HKEY_LOCAL_MACHINE\System\CurrentControlSet\Control\Terminal Server\WinStations\RDP-Tcp -> Double-click PortNumber in the right pane -> Change the value to Decimal and enter the port number between 1001 to 254535.
Method 7: Change Network Properties
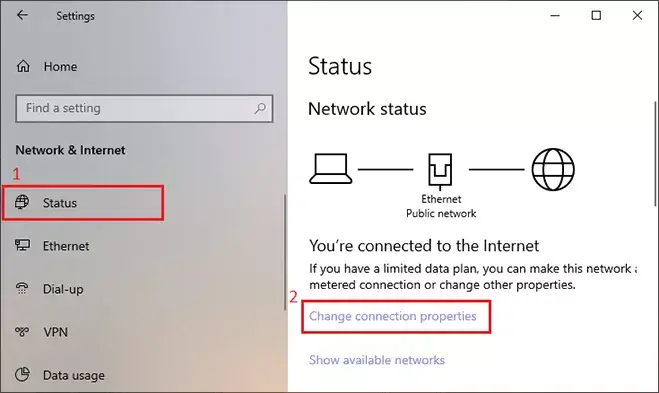
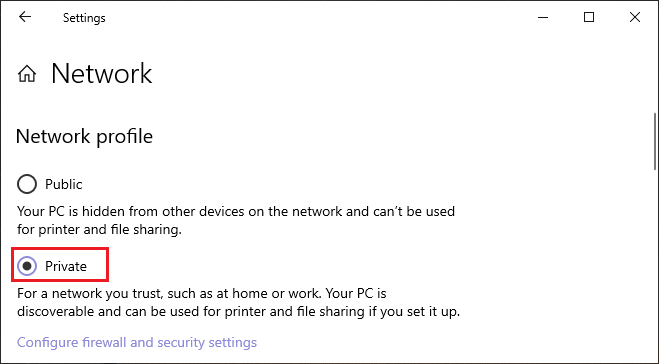
For the sake of PC and data security, remote connections are not allowed under a public network. You can switch the status of network connection following the steps below:
-
Step 1: Press Windows key + I simultaneously to open Settings -> select Network and Internet -> Status -> click on Change Connection Properties.
-
Step 2: Switch the network status from Public to Private.
Conclusion
The above 7 methods are simple and effective to handle the issue remote desktop connection failure in Windows 10. Or if none of them work out for you, you can resolve the problem with the help of a third-party tool, for instance, Restoro PC Repair Tool.


