How to Format Tables in Microsoft Word 2016

There are a few methods you can use to organize the content in a Word file. Arranging text into columns is an effective way to make a paragraph or a page more attractive and readable. You can read How to Format Columns in Word 2016 for further information. Tables allow you to separate data into columns and rows, which is a better way to display associated data. If you're trying to format tables in Microsoft Word 2016 quickly and effectively, take a few minutes to enact these methods.
1. Format tables using table styles
Microsoft Word provides different kinds of table styles for us to use. It's convenient for us to apply the table style we like in the table tools. When your document contains several tables that you want to format, it saves a lot of efforts to apply table style instead of customizing formats to each table. To apply a table style to a table:
a. Click the table once to see the "Table Tools" on the Ribbon.
b. Click "Design" in the Table Tools. Click the down arrow at the bottom right of the "Table Style" group and a drop-down menu appears. Then you can see table styles available for use.

Of course, you can create new styles of table. In the interface where you can select the built-in table styles, click New Table Style. In the pop-up window named "Create New Style from Formatting", you can customize a new style of tables.
2. Format table columns using AutoFit
A quick way to adjust the size of table columns is to use AutoFit. It can resize the column in your table automatically. Check how to format table columns using AutoFit below.
a. Click anywhere on the table.
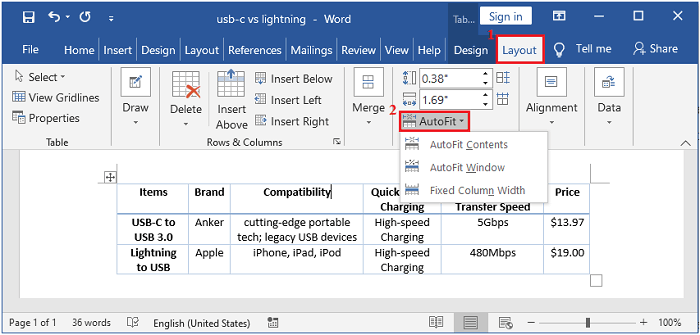
b. Click the "Layout" tab in the Table Tools and click the AutoFit in the Cell Size group.
c. Choose one of the types you want to use.
To adjust your columns to be the same width as the content automatically, choose the "AutoFit Contents". To adjust columns to be the same width as the page automatically, select the "AutoFit Window". If you want to turn off AutoFit, select "Fixed Column Width".
Below is the effect of selecting "AutoFit Contents".
3. Highlight specific data
In addition to formatting an entire table, you can highlight specific rows, columns, or table cells to emphasize the data. There are two ways to achieve it, adding outside borders and filling cells with color. Check how to add outside borders below.
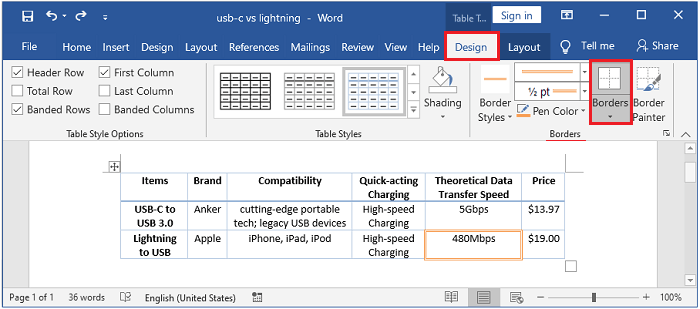
a. Place the cursor in the table cell you want to add borders. Click the "Design" tab on the menu, find the "Borders" group on the right side.
b. Select the style, size, and color of the border one by one. Click on "Borders" and choose Outside Borders in the pop-up window.
Follow this procedure to fill color in a table cell.
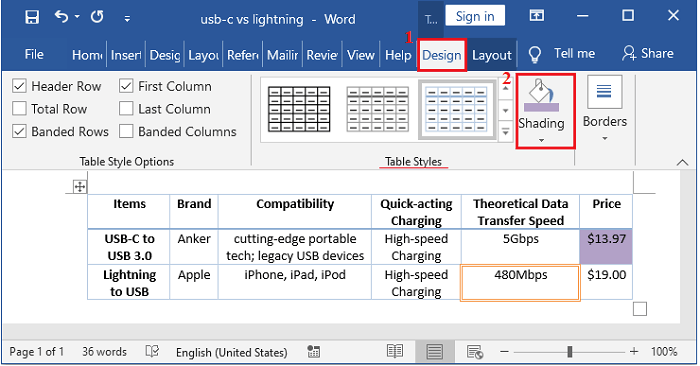
a. Position the cursor in the cell. Click the "Design" tab on the menu, find the "Shading" in the Table Style group.
b. Click on the drop-down icon of Shading and select a color. Then click on the icon to fill color in a table cell.
4. Customize table styles with Shading and Borders Painter
Creating new styles of table by adding Shading and using the Border Painter will be more convenient. Adding Shading to a table can make certain cells, or the entire table stands out in your document. The easiest way to add colored shading to a table is to use the Shading menu. To add Shading to a cell or table:
a. Select the cells or the entire table you want to add shading.
b. Click on the drop-down icon of Shading and choose a color in the "Theme colors" window. Then click on the icon to fill color to the selected cells.
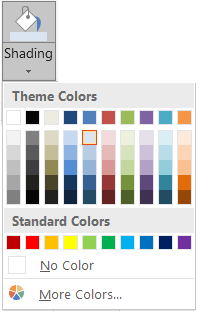
Repeat the above steps until you complete adding shading. If you want to delete the shading, go on the "Theme color" window and choose "No color" to fill the cells.
Adding different styles and different colors of borders makes your table formats more unique. The easiest way to achieve it is to use Border Painter. To add different borders to cells or tables:
a. Place the cursor anywhere on the table.
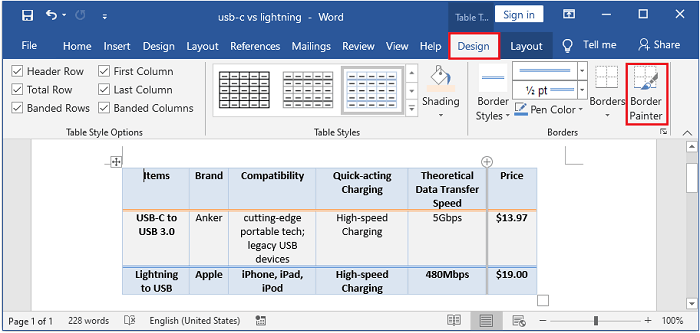
b. Click the "Design" tab on the menu. In the "Borders" group, select the style, size, and color of the border one by one. Click on Border Painter and then add borders to the cells you like.
Below is the effect of creating table styles with Shading and Borders Painter.
5. Position tables on the page
By default, Word aligns a table on the left. If you want to change its location, there is an easy way to move the table to the place you want quickly. To do this, hold down the cross in the upper left corner of the table and drag the table to the preferred location.
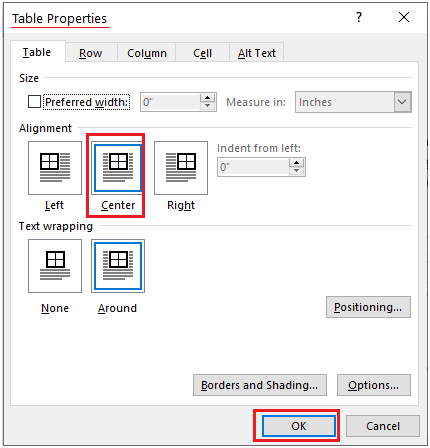
For precise control over the table location, you can right-click on the table and choose Table Properties. Under the "Alignment" section, select the position of the table. In general, we would place the table in the center of the page. Choose Center and click on "OK" to confirm.
6. Save and reuse table formats
After formatting a table, think about this question: Will this table style be used again? If yes, delete the data in it. Save the table format and insert new data when required. With saving table formats to Quick Part Gallery, you won't have to recreate the layout again. Check how to save and reuse table formats below.
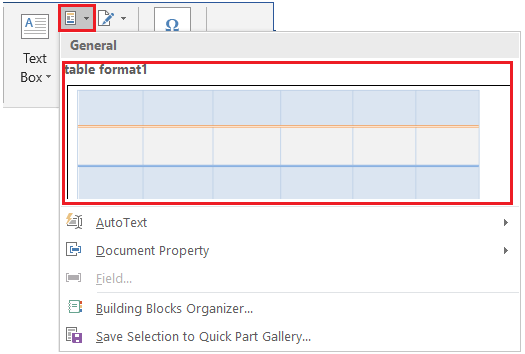
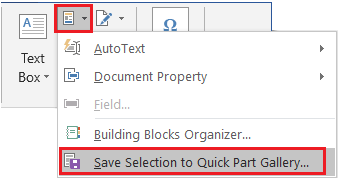
a. Select a table. Click the "Insert" tab on the Ribbon, and then click the Explore Quick Parts icon in the "Text" group.

b. Choose Save Selection to Quick Part Gallery.
c. Place the cursor where you want to reuse the table. Go to Ribbon > Insert > Explore Quick Parts.
d. Then you can see the table saved in the Quick Part Gallery. Click the table for reuse.
