How to Make an Ubuntu Virtual Machine Share the Host's VPN

July 23, 2024

Sharing a host's VPN with an Ubuntu virtual machine is essential for maintaining consistent network security and privacy across all your virtual environments. This guide will walk you through the necessary steps, detailing both Graphical User Interface (GUI) and command line methods to configure your Ubuntu VM to share the host's VPN.
Prerequisites
Before you start, ensure you have the following in place:
- Download and install v2rayN on the host machine.
- Allow connections from the LAN (Local Area Network).
- Configure and open the software proxy.
- Determine the proxy configuration.
For more details, see steps one to three in this article: How to Make a Windows Virtual Machine Share the Host VPN.
Part 1: Configure Proxy in GNOME Settings (GUI)
Verify that the Proxy Server is Available
1. Start the Ubuntu virtual machine. Open the terminal by pressing Ctrl + Alt + T.
2. Use the nc (netcat) command to verify that the proxy server is available:
nc -zv 192.168.1.6 10809Replace "192.168.1.6 10809" with your actual IP address and port.

Configure Proxy in Ubuntu Virtual Machine
1. Click on the network icon at the top right corner, then click the arrow to the right next to "Wired". Select "Wired Settings" to open the network setting page.
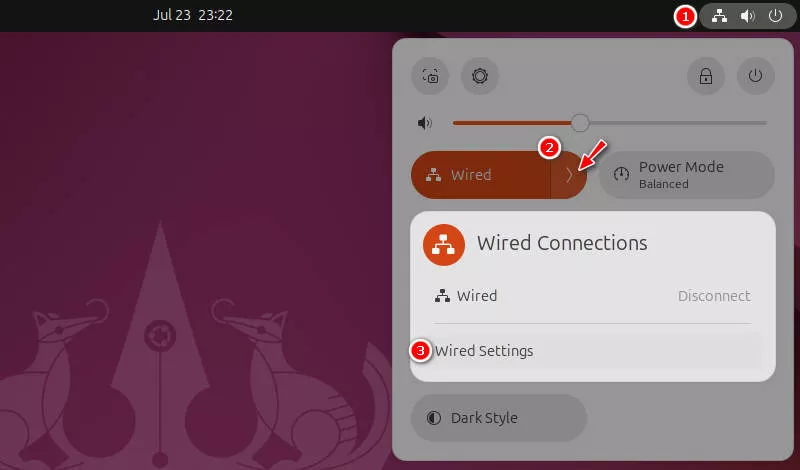
2. Select "Proxy" in the main panel.
3. Toggle on the Network Proxy button. Choose "Manual" from the "Configuration" drop-down list.
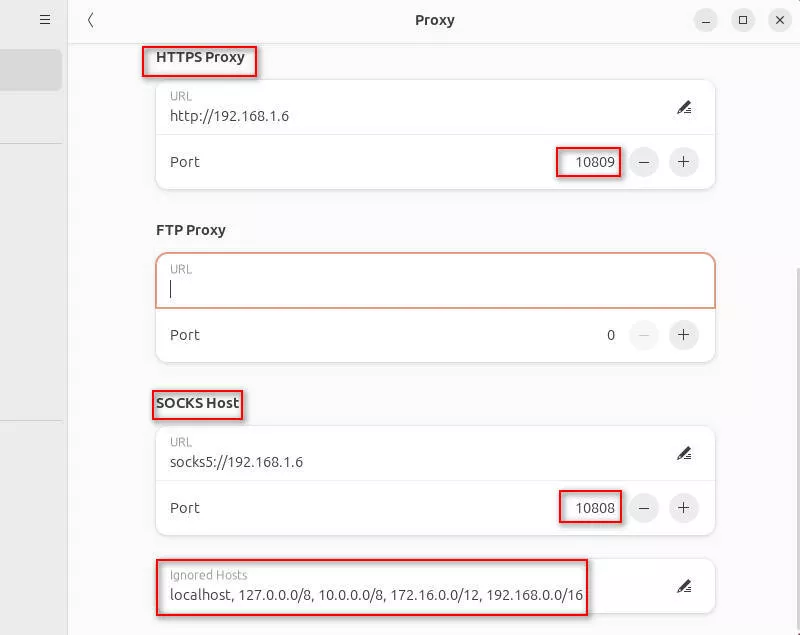
4. Edit the proxy settings for HTTP, HTTPS, FTP, and SOCKS:
URL: http://YOUR_HOST_IP
Port: The port number displayed in the lower left corner of the v2rayN.
5. Add ignored hosts to bypass the proxy:
localhost,127.0.0.0/8,10.0.0.0/8,172.16.0.0/12,192.168.0.0/16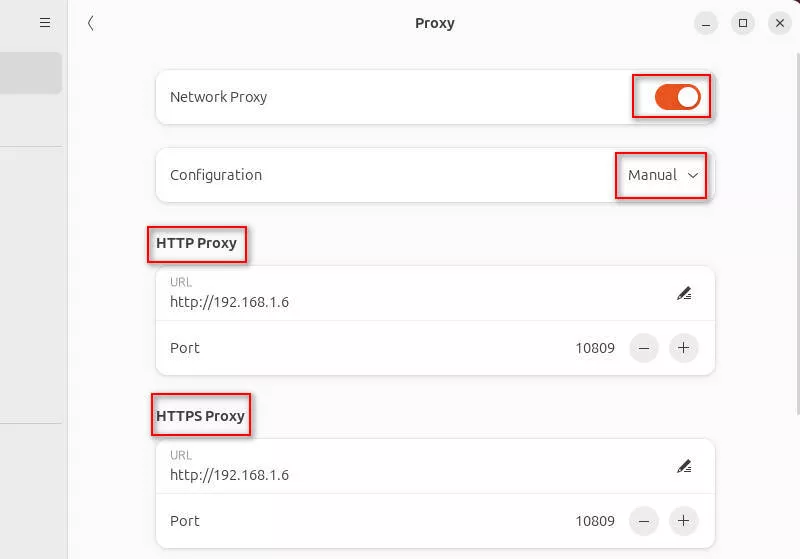
6. Click the Save button in the top right corner to save the configuration.
7. All software using GNOME, such as the browser, file manager, and app center, will follow these proxy settings.
Part 2: Configure Proxy via Command Line
2.1 Configure Proxy for Terminal
For Current Terminal Session
This configuration will take effect only for the current session.
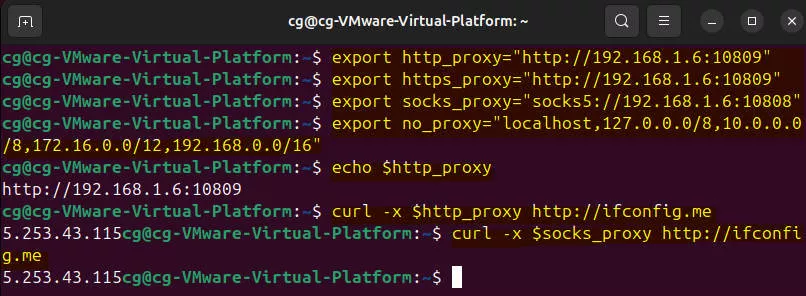
Open the terminal and enter the following commands:
export http_proxy="http://proxy-server:port"
export https_proxy="http://proxy-server:port"
export socks_proxy="socks5://proxy-server:port"
export no_proxy="localhost,127.0.0.0/8,10.0.0.0/8,172.16.0.0/12,192.168.0.0/16"
Replace "proxy-server:port" with your host's IP address and your actual port.
After this configuration, subsequent commands will go through the proxy.
For All Terminal Sessions
This method will be valid until you modify the configuration again.
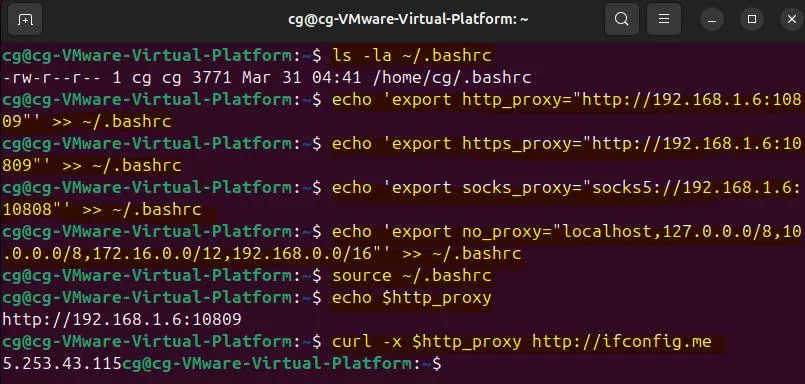
1. Check if the ".bashrc" file exists using the ls command:
ls -la ~/.bashrcIf the file doesn't exist, create it using the touch command:
touch ~/.bashrc2. Add proxy settings to the ".bashrc" file:
echo 'export http_proxy="http://proxy-server:port"' >> ~/.bashrc
echo 'export https_proxy="http://proxy-server:port"' >> ~/.bashrc
echo 'export socks_proxy="socks5://proxy-server:port"' >> ~/.bashrc
echo 'export no_proxy="localhost,127.0.0.0/8,10.0.0.0/8,172.16.0.0/12,192.168.0.0/16"' >> ~/.bashrc
3. Verify the settings using the echo command:
echo $http_proxy
echo $https_proxy
echo $socks_proxy
echo $no_proxy
4. Load the configuration:
source ~/.bashrcThe terminal will now use the proxy.
2.2 Configure a System-Wide Proxy
1. Edit the "/etc/environment" file using the nano editor:
sudo nano /etc/environment2. Add these lines to the file:
http_proxy="http://proxy-server:port"
https_proxy="http://proxy-server:port"
socks_proxy="socks5://proxy-server:port"
no_proxy="localhost,127.0.0.1,::1"
Example:
http_proxy="http://192.168.1.6:10809"3. Save and exit the nano editor. Press Ctrl + O, then hit Enter to save the file. Press Ctrl + X to exit the editor.
4. Reboot to make the changes effective:
sudo reboot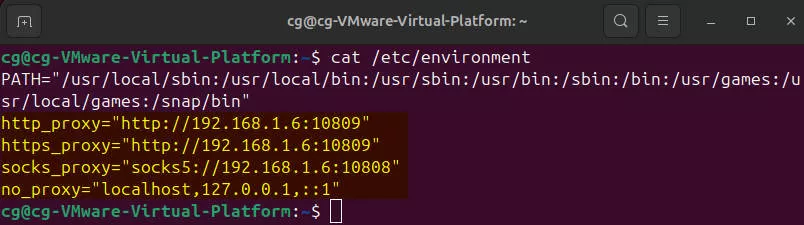
Tip 1: You can clarify the proxy configuration by commenting out the corresponding lines. Add comments by typing "#" before each line.
Tip 2: You can set the default proxy for all protocols by defining the environment variable "all_proxy" with the value "socks5://PROXY_SERVER_IP:PORT". This way, any protocols that are not explicitly configured will use this default SOCKS5 proxy.
all_proxy="socks5://proxy-server:port"Summary
Making an Ubuntu virtual machine use the host's VPN is a practical tip to maintain network security and privacy. This guide provides two methods: GUI and command line. The GUI method is intuitive and easy to use, while the command line method offers more fine-grained and personalized control. Choose the method that suits your situation best. Good luck!